Are you working with Data? By data, I mean surveys, demographic information and statistical data, evaluation data, scores from tests, or any observation related data. Are you trying to take your data to the next level by finding patterns in it and telling it in a way that makes sense to your general public? [Read more…] about Fusion Tables – Free App from Google for Working with Data
Blog entries
Informative blog articles from Blogger IQ
“Simple English” Wikipedia for People Who Are Learning English
Am sure you know Wikipedia. We all do, correct? But have you come across people who are still new to English language and then there are also students looking for an easy to understand generic explanation or children and adults with learning difficulties? [Read more…] about “Simple English” Wikipedia for People Who Are Learning English
How to add a Sticky and Floating Sidebar Widget in WordPress
Real estate on your blog is so valuable that we often miss it to just show some white space. If you are conscious of how important your blog real estate is, you will ensure that it’s used to the max, of course sensibly.
In light of this, if you have a blog post that is, especially, a long one, then your reader will surely have to scroll down to read your post. But when that’s happening, you can also gently grab your reader’s attention using your sidebar widget area. This is very useful if you have email subscription opt-in box or any affiliate image or your premium content/post that you want to attract more traffic to.
This can be accomplished using a tiny and free WordPress plugin called – Q2W3 Fixed Widget (Sticky Widget)
Here’s a quick demo on how to use this plugin: (it’s very simple!)
- First, get your plugin installed from here. (this hasn’t been updated since long, but it works!)
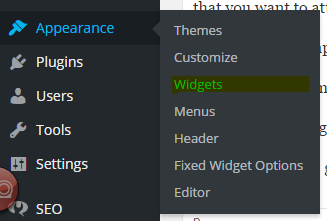
- After activating it, go to your widgets area.

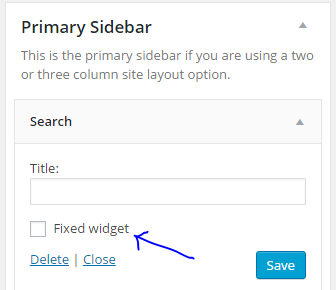
- Select any of your existing widgets – you will now see a new checkbox added within called ‘Fixed Widget’.
- Just select that checkbox – save and reload your site.
- You’ll see that the widget which was ‘fixed’ will now become a sticky widget when you scroll down your site.

You can use this technique to:
- stick your email opt-in form,
- show your eBook download button, in case you have one,
- affiliate banners,
- any announcements, etc.
How To Add A Clickable Image in WordPress Sidebar Widget (Manually)
Last Updated:
There comes a time when you may want to:
- Add a custom image to your WordPress sidebar as a clickable image that can lead to a downloadable document or a web page destination or
- Have an image on your sidebar to display your profile picture or
- You might want to promote some product and give a hyperlink to the image which can take your visitors to the product download page.
Did any of the above points express your current situation? If yes, you will have your answer in this post.
How to add an image in WordPress sidebar widget
Though you have to work with a little bit of HTML tags here, don’t worry we’ll try and make it as simple as possible.
What are the HTML tags and attributes used to show an image on the WordPress sidebar?
- “a” tag,
- “href” attribute,
- “target” attribute,
- “img” tag,
- “src” and “alt” attributes.
These are the 6 HTML nuts and bolts required for our setup.
The ‘img’ tag has 2 attributes: ‘src’ and ‘alt’. ‘src’ will take in the hyperlink to your image and ‘alt’ takes care of the alternate name for the image. And, the ‘a’ tag takes care of the hyperlinking (clicking on image) part wherein ‘href’ will handle the hyperlink part and the ‘target’ attribute will ensure that the destination link is opened in a new or separate tab or window.
Before we begin, get the image you want, uploaded and ensure you have a direct hyperlink to it. If you don’t know how to do that, here is a post I have written on how to use Dropbox to host your images. Else, see the blue box below on how to add media to your WordPress blog. I prefer the Dropbox way as it is more effective in terms of page speed and also I need not fill my hosting service provider with images and keep filling my hosting space.
Go to Media > Add New to upload your image. After uploading, click on ‘Edit’ – then you can give your file name, alt and caption attributes. Now, copy the hyperlink to your uploaded image from the right side of the screen.
On your WordPress widget area, click on the widget you want to use to display your image – it could be your sidebar, header or footer area. For this post, we will use the sidebar area.
Use the below code: Just insert the hyperlinks as applicable to you. Only change text that are given in bold. Leave the rest as is.
<a href=”insert your hyperlink here” target=”_blank”><img src=”insert your image URL here” alt=”sample image”/></a>
We hope this article helped you in solving your problem on adding an image to your WordPress sidebar. If you liked it, please share it with your colleagues and friends using ‘sharing’ options given in this page.
Think Outside The Circle! How To Get More Buyers
Post last updated:
What?
I have heard of ‘thinking out of the box’ but what is this ‘think out of the circle’?
I hear you thinking that.
For a quick bragging – this title itself is thinking out of the box! Why not a circle, instead of always a box? [Read more…] about Think Outside The Circle! How To Get More Buyers
