Though that helps you to see it in a ‘programmatic’ way, here’s a simple way (a layman approach) to find how many pixels your pic or blog or anything on your computer screen is.
We will use Microsoft Paint to get this done:
Go to run, type mspaintand hit enter.
Paint opens up with a blank white ‘paintable’ screen. Here, adjust the canvas inside Paint to your desired size using the placeholders given at its edges and corners.
Hit CTRL + E on your keyboard which brings up ‘Image Properties’ window.
Under ‘units’ ensure ‘pixels’ is selected.
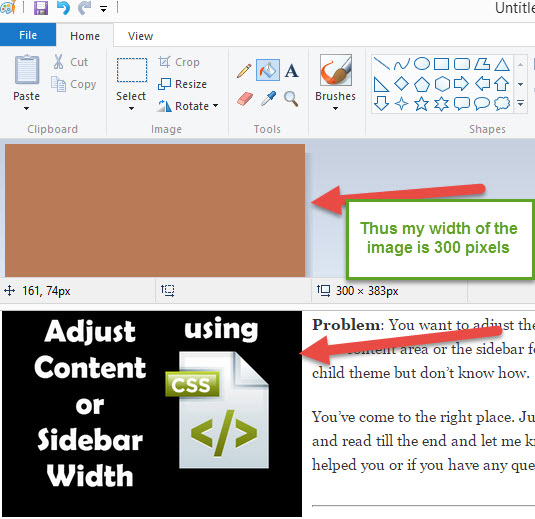
You’ll notice that the image’s width and height properties are shown in a numerical way.
That’s your width for the desired canvas or image or anything.
To compare this with any of your content on your blog, just place the paint canvas that we just measured on top of the content of your blog to see that content’s width: Here’s a screenshot example:
This is a layman approach to find any content’s width and since I am one, I often use this to find my content’s width. Sometimes, I do this with Chrome’s Inspect Element option too for not always one should remain a layman. 🙂 ((Just a lame try to be funny there!))
Please let me know your comments or if you have any questions or if you are just plain confused with the technique above. Happy to help!
The following technique best applies to CSS style sheets if you have a blog that is designed with a parent and child themes with the use of a framework like Genesis. Nevertheless, even if you have a Blogger Blogspot blog, this should still work seamlessly.
Problem: You want to adjust the width of your content area or the sidebar for your child theme but don’t know how.
You’ve come to the right place. Just sit back and read till the end and let me know if this helped you or if you have any questions.
First, let’s find the area on your blog which needs the adjustment. You can accomplish this by ‘Inspecting’ your page elements using Google Chrome’s Inspect Element option. (Friendly Note: Firefox fans – please use Firebug extension to do this exercise).
Go to your blog.
Right click on the area that needs alteration/adjustment.
Select ‘Inspect Element’.
Let me show you an example:
For my blog – thekeyponderer.com I wanted to increase my sidebar width by a little more pixels so I can easily fit in some of my widgets. So I right click on my sidebar in the blog.
If you notice the CSS styles section in the screenshot, my sidebar had a width of 270 pixels.
Now, I want to increase my width to 280 pixels so that I know I can fit in a particular widget that doesn’t fit in its current 270 pixel-wide sidebar.
So, I go to my WordPress > Appearances > Editor and start editing my style.css file.
Since, I want to edit my sidebar section I will search for .sidebar { as seen in my STYLES section. .sidebar { display: inline; float: right; font-size: 13px; line-height: 20px; width: 270px; }
I simply take a backup (copy/paste to a Notepad file) of my existing style.css code, then replace the width: 270px;with width: 280px;
Save and update the style.css file.
After I refresh my webpage, Voila! the sidebar width is now increased by 10 pixels; from 270px to 280px.
Changing the content width or any other area of your webpage is also similar. Just follow the steps given above.
I used Nomadic Child Theme for this above example and obviously, I use Genesis Framework. (Psst…I recommend this Framework strongly – one of the best and its the Industry standard in my humble opinion).
Hope this helped you in changing the content width or sidebar width for your blog. If it did, let me know and share your happiness with me below via comments.
Have questions, just shoot! I will do my best in helping you out.
Host images or any file on Dropbox and reduce your blog’s loading time
This process also saves you storage space on your precious hosting account, by hosting static files. But please remember that Dropbox cannot act as a CDN in the long run and you might inevitably find yourself looking for a regular CDN someday. Till then, and up to a point you want to scale up to that level, you may use Dropbox as the CDN.
Get your Dropbox from here – this special referral link gives additional FREE 500MB storage!
Recently, I encountered a problem while using StumbleUpon. And that was with sharing my website’s content. I kept on sharing a post after writing it on my blog and today I hit the limit.
So a quick Google search showed a reason for this.
And this reason made good sense too. StumbleUpon has kept this limit for a logical reason.
So, whenever you see this error from StumbleUpon:
Sorry, you can’t add any more pages from this site today. Please try again tomorrow.
There is only one thing you can do: keep sharing useful content from other websites too.